
Login with X
Halliday's SDK supports social login with X (Twitter), and is fully compliant with X's Terms of Service. This page provides a walkthrough for integrating Log In with Twitter and Halliday's Social Login Client with your application.
Checklist for setting up Halliday Social Login Client with X / Twitter
- If social login configurations has not been enabled yet, contact a Halliday team member or [email protected] to enable this feature for your app.
- Register an X Developer App
- Initialize Halliday's SocialLoginClient via Log In with Twitter
Registering an X Developer App
In order to enable Log In with X, you will need to obtain a Twitter App ID, which can be obtained through registering a developer app with X:
- Navigate to the Twitter Developer Portal, and log in with your Twitter account. Twitter may navigate you to your homepage after you log in, so you will need to manually navigate to the Developer Portal again if you aren't redirected there automatically.
- After you accept the terms and conditions for a free developer account, you are automatically granted one free app.
- Under your app settings, navigate to User Authentication Settings towards the bottom of the page. Here, you should enable User Authentication.
- Set App Permissions to be "Read", and set your app to be a Native App.
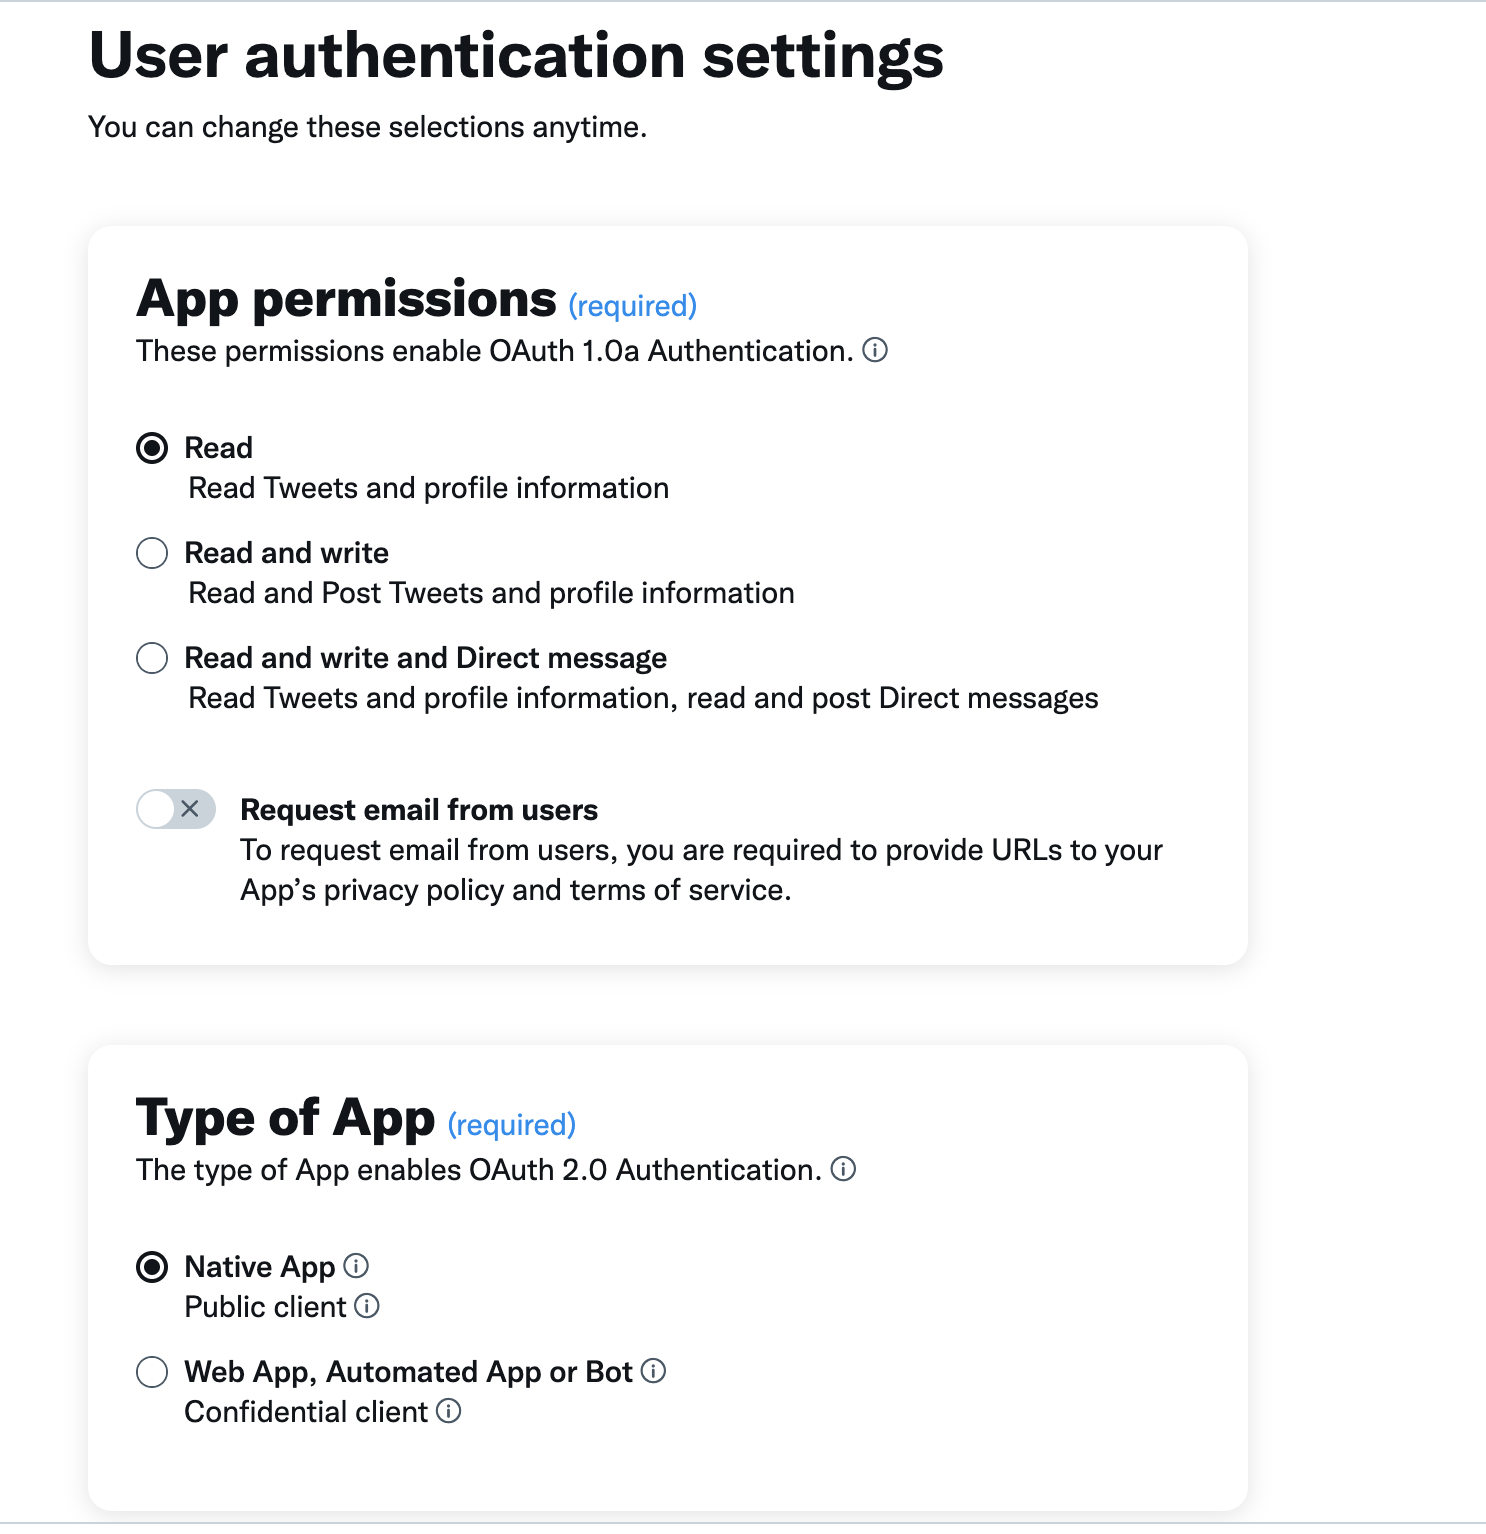
- Configure your callback URLs, which should be the redirect URLs that Twitter should redirect users to after they authenticate.
It is advisable to set up a separate handleRedirect route for Twitter
Due to Twitter's
same-origin-allow-popupsCOOP header that is set upon auth redirection, it is advisable to set up an intermediate handleRedirect route that handles retrieving Twitter's access tokens after the user login. Please refer to our code example below for more details.
- Save your app settings after you have finished configuring User Authentication.
- Navigate to the Keys and Tokens section, where you will find the OAuth 2.0 Client ID and Client Secret section. Once enabled, Input your Twitter client ID (not app ID!) into our Halliday Dashboard. With that, you now have set up your OAuth credentials for your Twitter Application that can be used with Halliday.
Initialize the Halliday SDK SocialLoginClient with Twitter
Be sure to register your Twitter client_id with the Halliday Dashboard so your users can perform social login with X!
Display the LoginWithTwitterButton
Due to the special nature of Twitter's COOP header during auth redirect, our Twitter authentication flow is split into two parts: the
LoginWithTwitterButtoncomponent andgetCurrentSocialLoginClient().
The following code example demonstrates a React integration for Twitter Login, which handles launching Twitter Auth, retrieving the Twitter access token, exchanging the access token for an oidc token, and instantiating the SocialLoginClient after a successful user authentication.
Different Social Login Methods should have different inGamePlayerId's
When a user logs in with a different social login provider (ex. Google vs Twitter), they will receive a different signer and Halliday Smart Account. To prevent confusion, it is important that you provide us a unique inGamePlayerId for each type of social login provider, even for the same user.
import { useEffect, useLocation } from "react";
import { LoginWithTwitterButton, BlockchainType, SocialLoginClient, SocialLoginClientParams } from "halliday-sdk";

export default function LoginComponent() {
  const [client, setClient] = useState<SocialLoginClient>();
  const location = useLocation();

  useEffect(() => {
    (async () => {
      // In this example, we set twitter to redirect to /twitter-callback after user authenticates
      // Be sure to add /twitter-callback in your twitter developer app as an authorized callback!

      // initializeClientPostTwitterRedirect() will handle retrieving the Twitter access_token
      // and instantiating the SocialLoginClient afterwards.
      if (location.pathname === "/twitter-callback") {
        try {
          hallidayClient =
            await SocialLoginClient.initializeClientPostTwitterRedirect();
        } catch (e: any) {
          console.error("Error initializing client post twitter redirect: ", e);
          hallidayClient = null;
        }
      }
      // Optional: add an else block that calls getCurrentSocialLoginClient
      // to check if the user is already logged via Google or Facebook.

      if (hallidayClient) {
        // Once the client has been initialized, you can access your Halliday Smart Account!
      	const wallet = await hallidayClient.getOrCreateHallidayAAWallet();
        setClient(hallidayClient);
      }
    })();
  }, []);

  // If there is no active client, display the Login with Twitter button
  if (client === null) {
    return (
      <LoginWithTwitterButton
        hallidayPublicApiKey={"YOUR_HALLIDAY_API_KEY"}
        sandbox={false}
        inGamePlayerId={"user's in_game_player_id for Twitter"}
        blockchainType={BlockchainType.MUMBAI}
        twitterRedirectUri={"your-twitter-redirect-uri"}    // be sure to register this on Twitter!
      />
    );
  }
}
Once the client is initialized, you will be able to send transactions with your Halliday Smart Account, and you'll have access to all of our other amazing Halliday Smart Account features (including session keys and more)!
Log Out of SocialLoginClient
Before your user logs out of your application, it is important to log them out of the SocialLoginClient as well to clear any session data. You can log out of the client by calling the client.logout() function.
Updated about 1 month ago