
Login with Google
Halliday's SDK supports social login with Google, and is fully compliant with Google's Terms of Service. This page provides a walkthrough for integrating Log In with Google and Halliday's Social Login Client with your application.
Checklist for setting up Halliday Social Login Client with Google
- If social login configurations has not been enabled yet, contact a Halliday team member or [email protected] to enable this feature for your app.
- Register a Google Developer App
- Initialize Halliday's SocialLoginClient via Log In with Google
Registering a Google Developer App
In order to enable Log in with Google, you will need to obtain a Google client_id:
- Navigate to Google Cloud Console, and log in with your Google Account.
- Click on "Select a Project" , then "New Project", and follow the configuration instructions as shown. After filling out your project configurations, click "Create".
- Once the project is created, navigate to the "APIs & Services" dashboard, and click "Credentials" on the left panel.
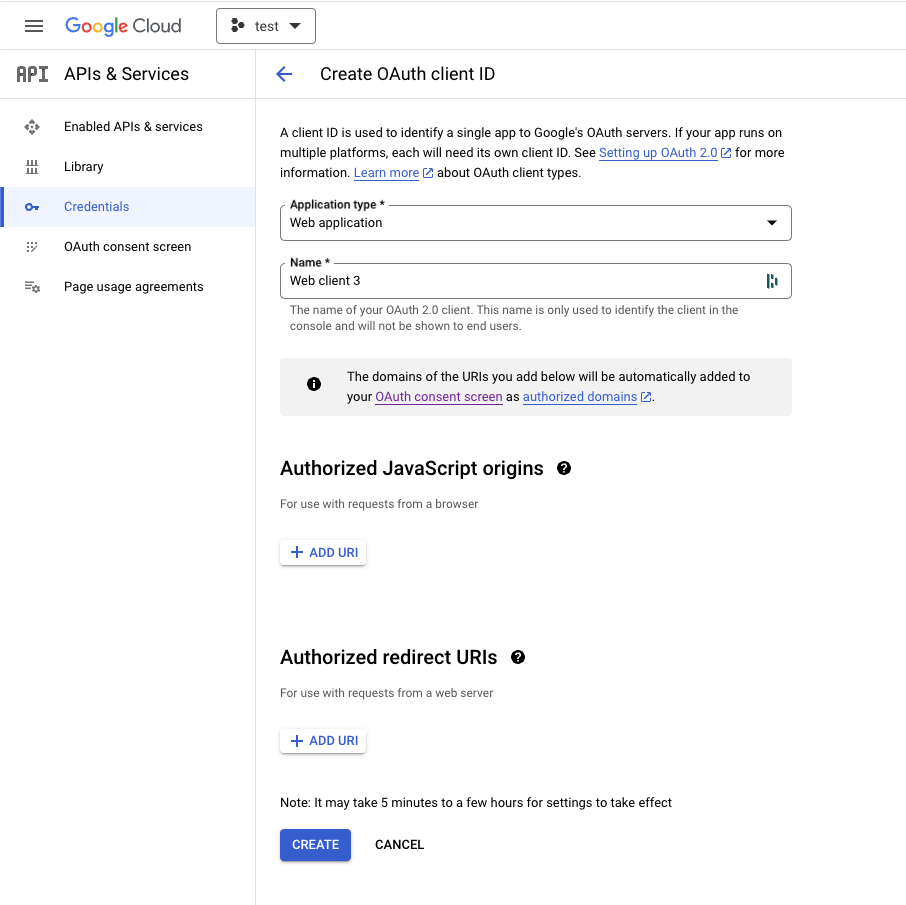
- Click "Create Credentials", and create a "OAuth Client ID". When prompted for your application type, select "Web application".
- Now, it is important to configure your Authorized Javascript Origins and Redirect URIs properly in order for users to successfully login with google:
- Under Authorized Javascript Origins, provide the URI from which your login screen is on. This whitelist informs Google that any login requests make from your login page to Google are not XSS attacks. Be sure to only whitelist your domains so no other domains can perform user authentication via your application!
- Under Authorized Redirect URIs, add in the same URI. Our SDK assumes that your current login URI will be your redirect URI. If you need to navigate your users elsewhere after logging in, please do so after you initialize our SDK.
- After you create your oauth configuration, you will be provided with a public
client ID, which has the form ofabcdefg123****.apps.googleusercontent.com. You will need to input theclient_idinto the Halliday Dashboard. With that, you now have set up your OAuth credentials for your Google Application that can be used with Halliday.
Going Live with your Google Developer App
In order for your users to authenticate via Google Sign In, you will need to go live with your Google Developer Application. Under the "OAuth Consent Screen" tab on the left panel, you will be able to publish your app so any user with a Google Account can authenticate with your application and receive an OIDC token that proves their identity.
Initialize the Halliday SDK SocialLoginClient with Google
Be sure to register your Google client_id with the Halliday Dashboard so your users can perform social login with Google!
Load the Google GSI Client Script in index.html
index.htmlIn your index.html, you will need to add the Google GSI client script tag to enable Log in with Google. This script tag loads the auth flow after your user clicks the Google icon that launches the Google authorization flow.
<!-- Load GOOGLE CLIENT SDK for Log In with Google -->
<script src="https://accounts.google.com/gsi/client" async></script>
Display the LoginWithGoogleButton
The LoginWithGoogleButton renders the Google button, which launches the Google auth flow and initializes the SocialLoginClient upon successful login. The code example below is a sample integration of our SDK:
Different Social Login Methods should have different inGamePlayerId's
When a user logs in with a different social login provider (ex. Google vs Facebook), they will receive a different signer and Halliday Smart Account. To prevent confusion, it is important that you provide us a unique inGamePlayerId for each type of social login provider, even for the same user.
import { useState } from "react";
import { BlockchainType, LogInWithGoogleButton, SocialLoginClient } from "halliday-sdk";

export default function LoginComponent() {
  const [client, setClient] = useState<SocialLoginClient>();

  useEffect(() => {
    // Optional: check if there is an active session
    const hallidayClient = await SocialLoginClient.getCurrentSocialLoginClient(
      hallidaySocialLoginParams
    );
    setClient(hallidayClient); // setClient can be null.
  }, []);

  if (client == null) {
    return (
      <LoginWithGoogleButton
        hallidayPublicApiKey={"YOUR_HALLIDAY_API_KEY"}
        sandbox={false}
        inGamePlayerId={"user's in_game_player_id for Google"}
        blockchainType={BlockchainType.MUMBAI}
        setClient={setClient}
      />
    );
  }
}
Upon successful login, the initialized Halliday client will be passed to setClient, and you will be able to use it to send transactions with your Halliday Smart Account. You'll also have access to all of our other amazing Halliday Smart Account features (including session keys and more)!
Log Out of SocialLoginClient
Before your user logs out of your application, it is important to log them out of the SocialLoginClient as well to clear any session data. You can log out of the client by calling client.logout() function.
Updated about 1 month ago