Halliday Payments Commerce Widget Quickstart
The Halliday Payments Commerce Widget allows users to perform onramps, swaps, and exchanges withdrawals to or from any chain or token with minimal integration effort.
It provides the most rapid integration of Halliday Payments with a feature-rich configuration.
To have more fine-grained control over the user interface, review the Headless Client documentation.
Installation
Install the Commerce SDK, which is available on NPM.
npm install @halliday-sdk/commerceNext the SDK can be imported into a front-end TypeScript or JavaScript project.
import { openHalliday } from '@halliday-sdk/commerce'Options
The openHalliday function accepts in the following configuration options:
| Name | Type | Description |
|---|---|---|
apiKey | string | The API key. Visit dashboard.halliday.xyz (opens in a new tab) to create one. |
authType (optional) | string (AuthType) | Can be a string of value "SESSION_KEY" or "SIWE" |
customStyles (optional) | object (CustomStyles) | Custom styles for the widget. See customizing styles. |
destinationAddress (optional) | string | The token recipient address. Default is the signer address. |
destinationChainId | number | The chain ID of the chain in which the tokens will be received. |
destinationTokenAddress | string | The contract address of the destination token. |
externalId (optional) | string | External identifier for the user. Default is the signer address. |
getFunder (optional) | () => {} | Must return two parameters, a string with the address of the funder and the chain ID as a number, wrapped in a promise. |
getSigner (optional) | () => {} | Must return an Ethers v6 Signer (opens in a new tab) wrapped in a promise. |
onrampInputAmount (optional) | string | The onramp amount to set in the Halliday widget. Inmutable if provided. |
onrampProviders (optional) | string[] (OnrampProvider[]) | The onramp providers to show in the Halliday widget. Default is all providers. |
onrampStatusCallback (optional) | () => {} | Callback has a single object parameter with updateType (string) and onramp (object). |
services (optional) | string[] (Service[]) | The services to allow. Each one of "ONRAMP", "SWAP". Default is all services. |
targetElementId (optional) | string | The HTML element id to render the embedded iframe inside of. If set, windowType must be "EMBED". |
useSandbox (optional) | boolean | Whether to use testnets and the like, or operate for real. If set to true, use a sandbox API key. Default is false. |
userId (optional) | string | Identifier for the user. Default is the signer address. |
windowType (optional) | string (CommerceWindowType) | Either "POPUP" or "EMBED". Default is "POPUP". |
Type Definitions
type AuthType = "SESSION_KEY" | "SIWE";

interface CustomStyles {
  primaryColor?: string;
  backgroundColor?: string;
  /**
   * In popup mode, the border only shows when the window is resized and made larger.
   * If you would like there to be no border at all, you can set it to the same color as backgroundColor.
   */
  borderColor?: string;
  textColor?: string;
  textSecondaryColor?: string;
  logo?: {
    style: { [key: string]: any };
    src: string;
  };
}

type OnrampProvider = "MOONPAY" | "STRIPE" | "TRANSAK";

type Service = "ONRAMP" | "SWAP";

type CommerceWindowType =
  /** Open the commerce process in an iframe within the current window. */
  | "EMBED"
  /** Open the commerce process in a popup window. */
  | "POPUP";
Usage Patterns
Using the wallet connector
Halliday can prompt users to choose a wallet to connect to the DApp. The wallet connector provides many options including MetaMask, Coinbase Wallet, Phantom, or Wallet Connect.
Clicking the button will trigger the connect-wallet prompt. If the application already prompts the user to connect a wallet, see using a connected wallet.
Try out onramping to an external wallet with this button:
import { openHalliday } from "@halliday-sdk/commerce";

openHalliday({
    apiKey: HALLIDAY_PUBLIC_API_KEY,
    // Arbitrum
    destinationChainId: 42161,
    // USDC on Arbitrum
    destinationTokenAddress: "0xaf88d065e77c8cC2239327C5EDb3A432268e5831",
    services: [ "ONRAMP" /* , "SWAP" */ ],
});
Using a connected wallet
Halliday can accept a wallet connection that the DApp has already established. With this flow, the user connects their wallet using the application's original flow. The DApp can pass a getSigner function that returns the connected wallet signer to the Halliday SDK for authentication.
This offers an enhanced user experience for Web3 applications, since users do not need to re-connect their wallet using the Halliday external wallet modal. If the application does not already have a connected wallet, see using the wallet connector.
Try out onramping to a demo embedded wallet with this button:
import { openHalliday } from "@halliday-sdk/commerce";

openHalliday({
    apiKey: HALLIDAY_PUBLIC_API_KEY,
    // Arbitrum
    destinationChainId: 42161,
    // USDC on Arbitrum
    destinationTokenAddress: "0xaf88d065e77c8cC2239327C5EDb3A432268e5831",
    services: [ "ONRAMP" /*, "SWAP"*/ ],
    getSigner: () => connectedWalletSigner, // The signer for the previously connected wallet
});
Embedding as an iframe
By default, the commerce widget opens in a separate window or tab.
Another option is embed it within a page using an iframe. This can be done by providing two additional options: windowType and targetElementId.
When using the iframe mode, the commerce widget will show up like this:
import { openHalliday } from "@halliday-sdk/commerce";

openHalliday({
    apiKey: HALLIDAY_PUBLIC_API_KEY,
    // Arbitrum
    destinationChainId: 42161,
    // USDC on Arbitrum
    destinationTokenAddress: "0xaf88d065e77c8cC2239327C5EDb3A432268e5831",
    services: [ "ONRAMP" /*, "SWAP" */ ],
    windowType: "EMBED",           // Enable the embedded iframe mode
    targetElementId: "element-id", // The HTML element id to render the iframe inside of
});
Customizing styles
Halliday supports setting custom styles on the commerce widget in order to match an application's existing user interface.
import { openHalliday } from "@halliday-sdk/commerce";

openHalliday({
    apiKey: HALLIDAY_PUBLIC_API_KEY,
    customStyles: {
     primaryColor: '#444',
     backgroundColor: '#000',
     borderColor: 'rgba(0, 0, 0, 1)',
     textColor: 'green',
     textSecondaryColor: '#fafab9',
     logo: {
      src: 'https://example.com/images/logo.png',
      style: {
       height: '20px',
       width: '167px',
      },
     },
    },
    // ...
});
The following diagram shows how these values are used:
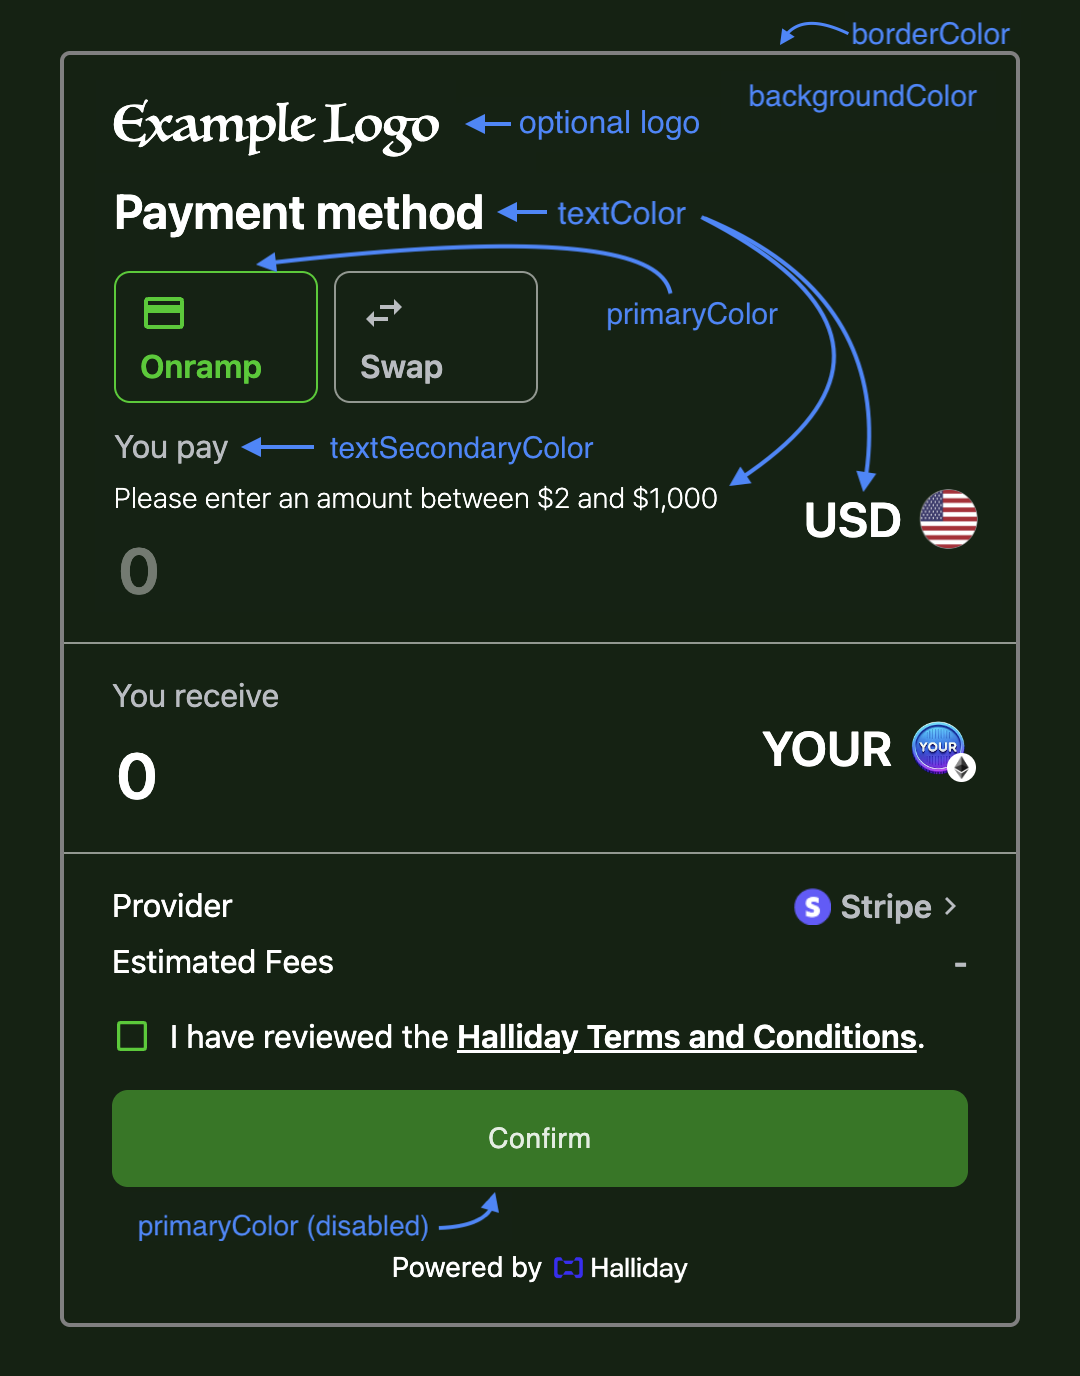
For further customization, consider using the Headless Client, or speak with the Halliday team about specific requirements.