The Commerce Widget
The Halliday Commerce Widget allows your users to perform onramps, swaps, exchanges and offramps to or from any chain or token with minimal integration effort.
It provides the easiest way to get started with Halliday. This powerful API comes with a feature-rich configuration which is discussed in this document.
If you want more fine-grained control over the user interface, please see the Headless Client.
Installation
Once you've installed the Commerce SDK, you can import the commerce widget like so:
import { openHalliday } from '@halliday-sdk/commerce'Options
The openHalliday function takes in the following configuration options:
| Name | Type | Description |
|---|---|---|
apiKey | string | Your API key. Visit dashboard.halliday.xyz (opens in a new tab) to create one! |
destinationBlockchainType | string | The blockchain of the target token to receive. |
destinationCryptoType | string | The alias of the target token to receive. |
destinationAddress (optional) | string | The token recipient address. Default is the signer address. |
getSigner (optional) | () => Signer (opens in a new tab) | Function returning the embedded wallet signer to sign the authentication message. If not set, prompts user to connect wallet. |
services (optional) | string[] | The services to allow. Each one of "ONRAMP", "SWAP", "EXCHANGE" or "OFFRAMP". Default is all services. |
userId (optional) | string | Your identifier for the user. Default is the signer address. |
useSandbox (optional) | boolean | Whether to use testnets and the like, or operate for real. If set to true, use a sandbox API key. Default is false. |
windowType (optional) | string | Either "POPUP" or "EMBED". Default is "POPUP". |
targetElementId (optional) | string | The HTML element id to render the embedded iframe inside of. If set, windowType must be "EMBED". |
customStyles (optional) | object | Custom styles for the widget. See customizing styles. |
The meaning of these options and how they are typically used together is described in the sections that follow.
Usage Patterns
Using the wallet connector
Halliday can dialog with your users in order for them to choose a wallet to connect. Our wallet connector offers many options such as MetaMask, Coinbase Wallet, Phantom, or Wallet Connect.
When a user opens the popup they will be prompted to connect their wallet. If your application already prompts the user to connect their wallet, see using a connected wallet.
Try out onramping to an external wallet with this button:
import { openHalliday } from "@halliday-sdk/commerce";

openHalliday({
    apiKey: HALLIDAY_PUBLIC_API_KEY,
    // Arbitrum
    destinationChainId: 42161,
    // USDC on Arbitrum
    destinationTokenAddress: "0xaf88d065e77c8cC2239327C5EDb3A432268e5831",
    services: ["ONRAMP"],
});
Using a connected wallet
Halliday allows connecting a wallet that is already connected to your application.
With this flow, the user connects their wallet using your application's normal flow.
Your application passes a getSigner function that returns the connected wallet signer to the Halliday SDK for authentication.
This offers an enhanced user experience for Web3 applications, since users do not need to re-connect their wallet using the Halliday external wallet popup. If your application does not already have a connected wallet, see using the wallet connector.
Try out onramping to a demo embedded wallet with this button:
import { openHalliday } from "@halliday-sdk/commerce";

openHalliday({
    apiKey: HALLIDAY_PUBLIC_API_KEY,
    // Arbitrum
    destinationChainId: 42161,
    // USDC on Arbitrum
    destinationTokenAddress: "0xaf88d065e77c8cC2239327C5EDb3A432268e5831",
    services: ["ONRAMP"],
    getSigner: () => connectedWalletSigner, // The signer for the previously connected wallet
});
Embedding as an iframe
By default, the commerce widget opens in a separate window or tab.
If you would like to embed it in an iframe, you can do so by providing two additional options: windowType and targetElementId.
When using the iframe mode, it will show up as follows:
import { openHalliday } from "@halliday-sdk/commerce";

openHalliday({
    apiKey: HALLIDAY_PUBLIC_API_KEY,
    // Arbitrum
    destinationChainId: 42161,
    // USDC on Arbitrum
    destinationTokenAddress: "0xaf88d065e77c8cC2239327C5EDb3A432268e5831",
    services: ["ONRAMP"],
    windowType: "EMBED",           // Enable the embedded iframe mode
    targetElementId: "element-id", // The HTML element id to render the iframe inside of
});Note that Stripe does not support the embedded iframe mode, due to restrictions enforced by Stripe.
Customizing styles
Halliday supports setting custom styles on the commerce widget in order to match your application's user interface.
import { openHalliday } from "@halliday-sdk/commerce";
openHalliday({
apiKey: HALLIDAY_PUBLIC_API_KEY,
customStyles: {
primaryColor: 'black',
backgroundColor: '#fff',
borderColor: 'rgba(0, 0, 0, 1)',
textColor: 'green',
textSecondaryColor: '#fafab9',
logo: {
src: 'https://example.com/images/logo.png',
style: {
height: '20px',
width: '167px',
},
},
},
...
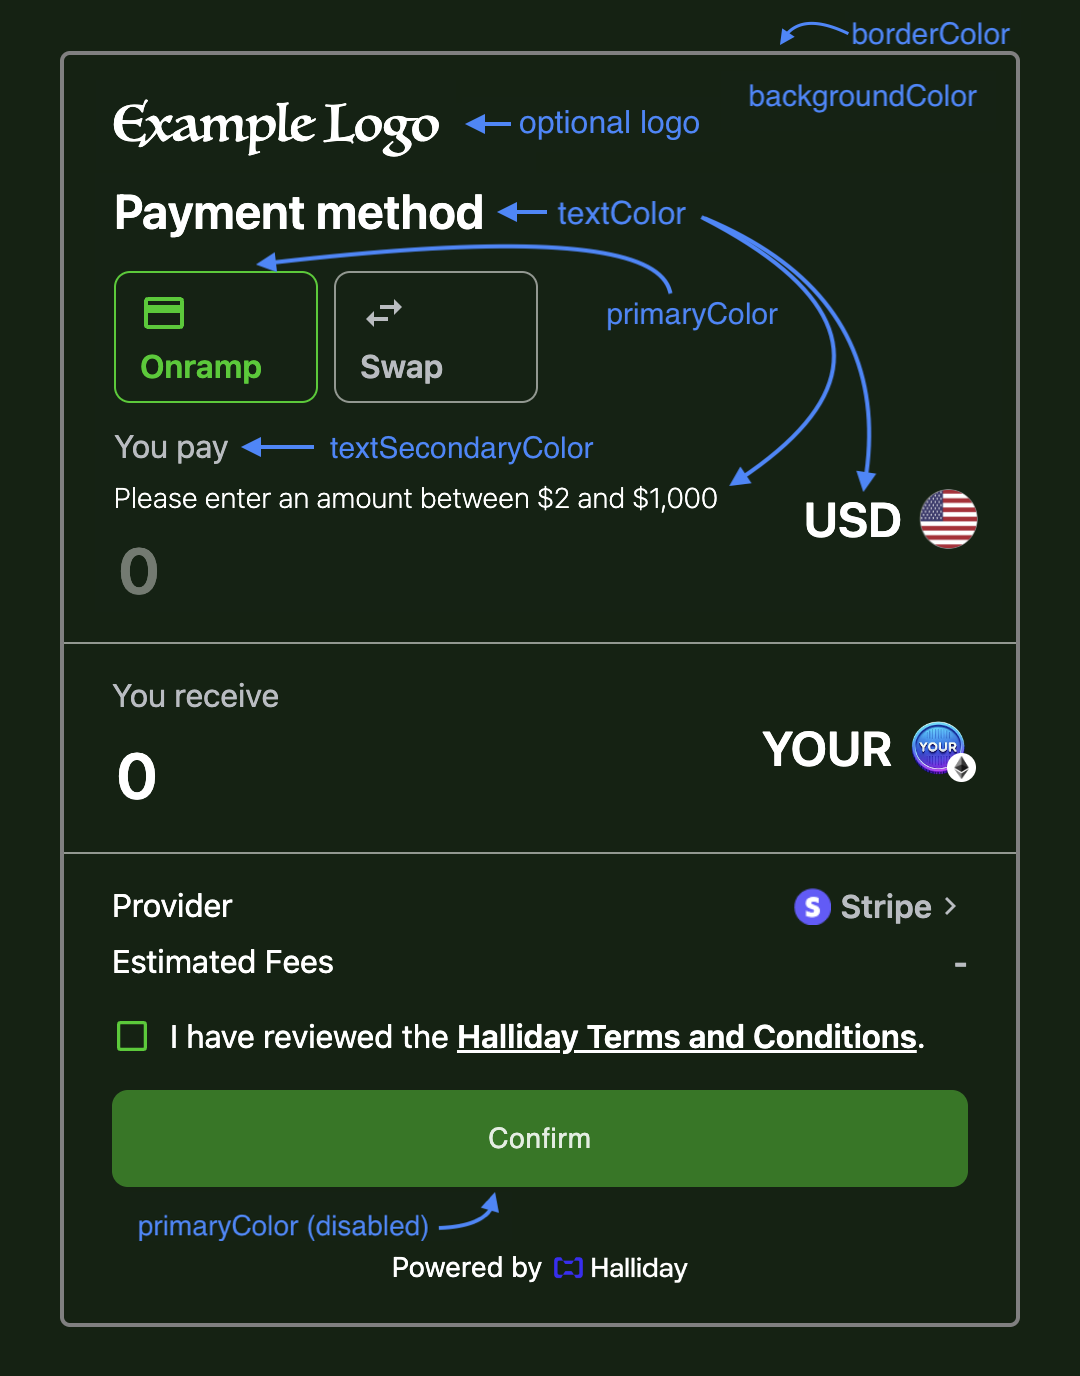
});The following diagram shows how these values are used:
If you are interested in further customization, please consider using the Headless Client, or speak with us about your needs.